One of the most important things in the Web Hosting industry is transparency towards your clients. This is why having a public uptime status page would greatly improve your client relationships and boost your credibility as a provider. Allowing your clients to view the infrastructure uptime status and history, even on the bad days when you’ve had downtimes, will only increase their trust in you as a provider.
So we’ve established that an uptime status page is very important, but not just any status page will do. Your uptime status page will need to look professional, it’ll need to be customizable, so it can perfectly match your website template, and it will need to efficiently display the information without confusing the viewer.
In the example below, you can see a fully functional uptime status page:
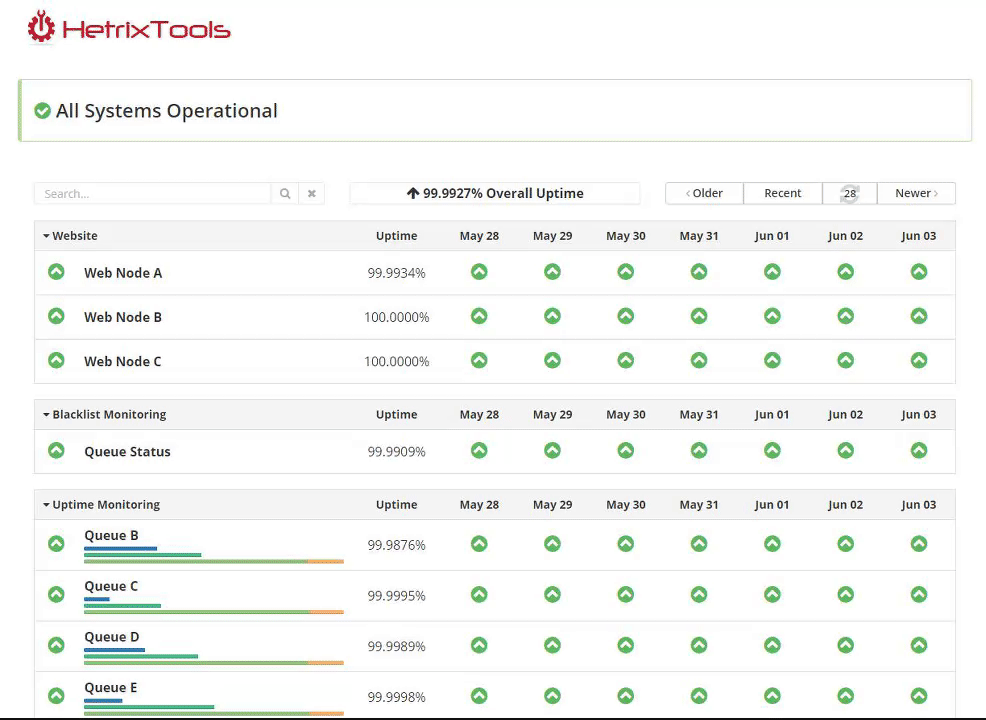
In this guide, we’ll go through all of the steps required for you to build your own uptime status page, just like the one shown above. So let’s begin.
1) Adding uptime monitors to your account
You will need to add several uptime monitors to your account, so you can populate your uptime status page with.
See our documentation for adding a website uptime monitor, service/ping uptime monitor, or SMTP uptime monitor.
Optional 1: you can assign categories to these uptime monitors so they will be neatly organized on your uptime status page. For more info on categories and how they affect your uptime status page, please see this article: https://docs.hetrixtools.com/categories/
Optional 2: learn how to arrange your categories in a specific order: https://docs.hetrixtools.com/how-to-order-categories/
2) Creating a Status Page with the desired uptime monitors
Begin by creating the status page from group actions, as described here: https://docs.hetrixtools.com/create-bulk-report-group-actions/
No worries, you can always add more uptime monitors to your status page at any later date: https://docs.hetrixtools.com/add-monitors-to-bulk-report/ or remove any of the uptime monitors from your status page: https://docs.hetrixtools.com/remove-monitors-from-bulk-reports/
3) Customizing your white label system
Now that you’ve got the status page, you’ll want to personalize it so it’ll match your website template.
Start customizing your White Label settings by adding a White Label Domain to your account, as described here: https://docs.hetrixtools.com/add-a-white-label-domain-name/
After you’ve added your White Label Domain, be sure to configure the status page (created at Step 2) as the domain’s landing page, as explained here: https://docs.hetrixtools.com/default-white-label-report/
4) Optional: add an announcement and a Twitter feed to your uptime Status Page
If you wish to keep your users informed in real-time of your uptime status events, you can do so by adding an announcement to your status page or adding a Twitter feed to your status page.
5) Optional: go a step further and embed your Status Page right into your website or billing system
If you want complete customization and integration of the status page into your website or billing system, you can even embed it, as described in this documentation article: https://docs.hetrixtools.com/embed-full-white-label-reports/
And it’s that simple. In just a few easy steps, you’ve got yourself a beautiful uptime status page to display to your clients.
If you have any questions or need any assistance with setting up your uptime status page, be sure to open a support ticket on our website.
6) Optional: install our server monitoring agent to display server stats on your Status Page
You can display real-time server resource usage (i.e., CPU/RAM/Disk/Network/etc.) on your status page by installing our Server Monitoring Agent on your server, as described here: https://docs.hetrixtools.com/category/server-monitor/
Then you can make these stats public as described in the following article: https://docs.hetrixtools.com/resource-usage-privacy/
Pingback: Pingdom Alternative – HetrixTools